Can-Am Maverick Forum banner

X3 Turbo r Air Intake Manifold blew apart

27K views 40 replies 19 participants last post by  x3og  
#1 ·
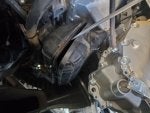
2017 X3 Turbo r intake manifold blew apart and separated after hearing a loud pop. Was just cruising along at mid rpm's. We wired it back together and limped it home. See the photo. You can see the bailing wire we used. That is a screw driver in the opening showing about what it looked like when separated. Is this a one piece unit? Looks like they cost about $330 new. Any ideas on what caused this? Only have about 1000 miles on the vehicle. Ran awesome until now. Thinking we need an adjustable blow off valve installed??? Not sure. Thanks for your help.
 
#2 ·
Welcome to the forum, what boost are you running tuner? Aftermarket blow off ? Usually only see this from some one pushing alot of boost
 
#3 ·
This is a known problem but rarely seem on a stock tune. You can search this and get more info. I am running 20psi of boost and mine has done fine but I replaced it before I was left with a broken intake.
 
#4 ·
a lean pop can break them
 
#6 ·
Seems all the failures I’ve seen are right at the seams where the two parts are glued together. Maybe BRP should partner with Gorilla Glue and maybe they will last a bit longer. I seem to remember the availability of aftermarket intakes in some older posts. Did the engine sound any different before the failure?
 
#8 ·
cheapo plastic glued together in mexico
I surprised they all dont fail
mine made it to 30 psi before I put a band-aid on it
and it never did fail with lots of 30psi on it
 
#11 ·


band-aid
 
#20 ·
Have not pulled it out yet but it does look like there is a gasket between the two halves. It appears to only have separated on the right (passenger) side. I'll remove the manifold, try and completely separate the two pieces, clean it up and epoxy back together and use some type of support like clips or wrap around bands or something. Will keep you posted.
 
#19 ·
I put springy "binder clips" on mine from Office Depot.
 
#24 ·
Chanses are the plenum is made out of ABS. So ABS adhesive would be better than epoxy as it would melt into the plenum, where as the epoxy would only be on the serface edges.
 
  • Like
Reactions: OCDualie
#26 ·
Sorry to revive this old thread but this is something worth doing to prevent down time or a ruined weekend. This would be a good thing to add when people ask "what's the first things I should do?" (Grease bearing, remove wheel scrapers, reinforce plenum etc)

What size clamps will work?

Previous post about ABS glue being better than epoxy. That sounds great if the part is in fact ABS. Is it ABS?
 
#27 ·
once they break they are probably not repairable
plastic zip ties do not have enough strength do do anything
 
#33 ·
This is what I did and so far it has held up great with almost 1000 miles @ 30 psi.

Drilled around the perimeter.


258253


Tapped for stainless 5mm button head machine screws that were long enough for washers plus a nylock on the opposite side.

258254


Installing fasteners. I used Vibra-tite on the threads.


258255


Filed the perimeter with a rasp file and used Permatex Black Plastic Welder to run a bead around the manifold.


258256

258257


Done

258258
 
#38 · (Edited)
Ah , that's right, the good old plenum clamp trick. 🤔

If the OP is running high pressure I would go billet from LaRue or Whalen.

edit: Whalen

 
#39 ·
It appears the plastic stock plenums ALWAYS blow apart on the seams. Just use a better bonding adhesive or grind a V grove in the seam and fill it in with JB weld .
The sealing onto the head is also shaky at higher boost with the stock plenum, you really need a tight O ring seal.

So it comes down to buy a machined aftermarket plenum with a center intake for a balanced charge. If you are going after 300+ hp get a 6 injector model.

Plan it all out forehand, make sure your tuner supports whatever you do, some tuners whine if you don't buy their 4 or 5 hundred dollar injector set. That is their hook on your pocket. I know this as a fact, I fell for this when I was a rookie.

Most 45mm class aftermarket turbos call for 1200 to 1400 cc injectors ($450) for a set of three. A set of 6 stock X3 XRS
(675cc $35ea) provides a more effective solution and keeps money toward a machined 6 injector plenum.
 
#40 ·
It appears the plastic stock plenums ALWAYS blow apart on the seams. Just use a better bonding adhesive or grind a V grove in the seam and fill it in with JB weld .
The sealing onto the head is also shaky at higher boost with the stock plenum, you really need a tight O ring seal.

So it comes down to buy a machined aftermarket plenum with a center intake for a balanced charge. If you are going after 300+ hp get a 6 injector model.

Plan it all out forehand, make sure your tuner supports whatever you do, some tuners whine if you don't buy their 4 or 5 hundred dollar injector set. That is their hook on your pocket. I know this as a fact, I fell for this when I was a rookie.

Most 45mm class aftermarket turbos call for 1200 to 1400 cc injectors ($450) for a set of three. A set of 6 stock X3 XRS
(675cc $35ea) provides a more effective solution and keeps money toward a machined 6 injector plenum.

and how do you drive these extra injectors...oh ya a $5000 ecu...LOL
 
  • Like
Reactions: HPnMORE4J
#41 ·
The dual injector sets need to be wired in a parallel config, and it's a 6 port machined fuel log that's required, but you weren't going to use the stock plastic one anyway.

The MAV R uses this 6 injector configuration.

My mistake on the injectors, it's the stock RR injectors (0280158454) that are approximately 600cc/min at 3 bar