
Just thought I would start a little thread about my new 25 Maverick R Max Smar Shocks. So far I have 150 miles on the machine. First things I noticed compared to the 24’s. The two dash compartments come with some spring pieces in them so they have a very solid latch and won’t come open or fly off. The Max also comes with rockblockers from the factory. These are a kind of harder plastic and not sure how long they will last when I get out rock crawling. The transmission in the max is a beast and physically bigger than the two seaters. The low range is way lower and seems to crawl great. I haven’t had it in anything to serious yet though. Also, it seems that the transmission is a little smoother and less clunky. They do still make noise as expected. The gps is lacking, but I have downloaded the UT map and on my ride last weekend it did show every road/trail that my Gaia and BCN showed. This is using the stand alone without having my phone connected. It does track for you with breadcrumbs, but it does not allow you add gpx files or preplan routes etc. I have been super happy so far and I think it will be an absolute beast. It is a little different comparing to my X3 with cvt. It is super nice cruising though as you can shift and control your rpm’s and keep it nice and quiet. It cruises at 65 the way the x3 cruises at 50. You can go down the road being street legal and it’s super comfortable. Hopefully get it down to Moab next weekend and do a Little Rock crawling.

GloverXRS

Glover’s Mav R Max Build
GloverXRS
Discussion starter
4,419 posts
·
Joined 2014
- Add to quote Only show this user
Just thought I would start a little thread about my new 25 Maverick R Max Smar Shocks. So far I have 150 miles on the machine. First things I noticed compared to the 24’s. The two dash compartments come with some spring pieces in them so they have a very solid latch and won’t come open or fly off. The Max also comes with rockblockers from the factory. These are a kind of harder plastic and not sure how long they will last when I get out rock crawling. The transmission in the max is a beast and physically bigger than the two seaters. The low range is way lower and seems to crawl great. I haven’t had it in anything to serious yet though. Also, it seems that the transmission is a little smoother and less clunky. They do still make noise as expected. The gps is lacking, but I have downloaded the UT map and on my ride last weekend it did show every road/trail that my Gaia and BCN showed. This is using the stand alone without having my phone connected. It does track for you with breadcrumbs, but it does not allow you add gpx files or preplan routes etc. I have been super happy so far and I think it will be an absolute beast. It is a little different comparing to my X3 with cvt. It is super nice cruising though as you can shift and control your rpm’s and keep it nice and quiet. It cruises at 65 the way the x3 cruises at 50. You can go down the road being street legal and it’s super comfortable. Hopefully get it down to Moab next weekend and do a Little Rock crawling.
GloverXRS
Discussion starter
4,419 posts
·
Joined 2014
I started with a Switchworks Alpha 12 controller. Decided to go this route instead of the switch pro that I had in the x3. So far very similar, but I do like how it comes with the Delphi connector pig tails to easily give you connections to plug/unplug on each circuit. You can also hook up your pieces in any spot and then configure the switch to be in whatever position you want. You can also add multiple pages if you wanted to create lots of buttons to control multiple functions. I have also added rugged radios M1 and remote head STX intercom. The R is much easier to work on for wiring etc than what the x3 is. The hole center console just pops off and gives you access with no tools. The dash also comes apart easily and gives you access from the top. I was able to fish the antenna cable up the a pillar and I have my light bar and wiper cable fished up the other side so that all my wires are inside and not just under my windshield.
![Image]()
![Image]()
![Image]()
Attachments
-
 2.2 MB Views: 75
1 post
·
Joined 2024
Hey! I’m using your post as inspiration while installing the switch works alpha 12 into my Mav R Max. Awesome content, thanks for sharing.
In one of those pictures, it looks like you removed the back left seat without removing the seat belt. I’m curious how/why you did that, because I am currently struggling to remove the back left seat to access the battery.
I have removed the driver seat as per the manual instructions, and that went well. But the manual instructions include removing the seatbelt anchors too.
My current blocker is the BOTTOM anchor points for the back left seat. I simply cannot reach them 🙃
So how did you remove that seat, and do you have any tips? Thanks!
GloverXRS
Discussion starter
4,419 posts
·
Joined 2014
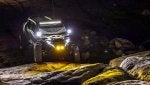
I also got a deal from Hella Lighting where they sent me some of their new light series and we did a promotional film for them. So I got them all installed. These new lights are pretty sweet. It’s a black magic series 40” lightbar that I would say is comparable to my rigid I have on the x3. The pod lights on the a pillars are 3” and the ones in front of the grille are the 4” with side shooters. These are pretty sweet and all of them have an X in them that you can light separately in either amber or white color. On the side shooters you choose if you want the left or the right side to come on. So I got a bunch of professional photos done and waiting for hella to approve the video. They seem to be very good quality and are pretty bright. I would say the 4” are not quite as bright as my BD LP4’s on the X3. But I also think they are a physically smaller light as well. I also added the WD Electronics street legal kit with replacement signature light blinkers. Kit is super clean and easy to do. I even have the blinkers in the factory dash blinking.
![Image]()

![Image]()
![Image]()
Attachments
-
 1.1 MB Views: 58
 -
 862 KB Views: 43
 -
 722.3 KB Views: 43
 -
 942.3 KB Views: 46
 -
 856.2 KB Views: 42
 -
 959.7 KB Views: 41
 -
 1.3 MB Views: 63
GloverXRS
Discussion starter
4,419 posts
·
Joined 2014
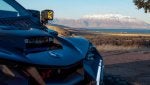
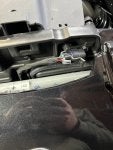
I have also installed the Triple R lighting elite 6 plus hood light with the tmw bracket. It will switch between amber and white or do both together, but I don’t have it wired up yet. Also does anybody know what this plug is for? It’s not there on the 24 SS 2 seater. But it’s just in this holder.
![Image]()
Attachments
-
 2.4 MB Views: 74
GloverXRS
Discussion starter
4,419 posts
·
Joined 2014
I also got some 1/2” rubber mat from Tractor Supply and cut it to fit under the center console in the front and rear where I could slide it in. Did this to hopefully help with some of the dust as there are a zillion holes in the skid plate. I also filled in the back sides as I have the superatv tilting seat brackets on order. This is good usable space that I used in the X3. The R has a little more room under the seats but the plastic is molded up to the cross bar and you cannot access it. You can access the under the front seats if you slide them all the way forward from the rear seats.
![Image]()
![Image]()
GloverXRS
Discussion starter
4,419 posts
·
Joined 2014
Then I also went around and adjusted all the doors so they lined up with the latches perfectly and didn’t drag at all. Pretty easy, just a few bolts to access the mounts with the slots. While doing this I also found this sticker that part was produced in April 24. It also has the color code which may be useful to someone.
![Image]()
GloverXRS
Discussion starter
4,419 posts
·
Joined 2014
Today I started installing the superatv tilting seat bases. Let me just tell you that these are the simplest most difficult things to get installed. Mostly because the instructions are terrible. There is definitely a left and a right from what I can tell but none of them are labeled as such. The instructions you cannot tell from pictures which orientation they are supposed to go without really looking at several of the pictures. All in all once you figure it out it’s quite basic and easy, but trying to decide took me way too long haha and making sure the tops matched up to the bottoms. I also had to stop for the night as I didn’t have an Allen head big enough to fit the one bolt. So tomorrow I will find one that did and finish the install. Hopefully once they are installed they will be quite handy and give some room to stuff a few things .
![Image]()
223 posts
·
Joined 2019
The instructions clearly show which two pieces are left and which are right. I dont see anything confusing about it.
GloverXRS
Discussion starter
4,419 posts
·
Joined 2014
Well I am undecided on these seat brackets. So far they have been a super pain in my ass. The little spacers they give to try and take up the slots in the seat rails are a super big pain in the ass trying to keep in place and then get lines up to be able to put the bolts in or the Clevis pins the send. Secondly they don’t fit the Mav R very good unless you keep the spacers underneath them. Which then in turn makes the seat sit so high it’s about useless for a normal size human haha. I will be reaching out to Super ATV. If the bracket fit down without the spacer it would probably be about right. I tried to do this but the brackets don’t fit and then the studs are too long just a little and they hit the bracket before allowing it to latch. Love the concept, but right now not thrilled with how they are working. On the passenger side just to get it back together to ride tomorrow I didn’t put in the spacers and then just used the factory bolts. Much easier to get the seat in and in place but may be too sloppy. Will have to do some more testing on that note. Then there is no left to right poj adjustment so the pin actually slightly hits metal to metal instead of going right into the latch perfectly.
![Image]()
![Image]()
![Image]()
![Image]()
![Image]()
![Image]()
![Image]()
![Image]()
GloverXRS
Discussion starter
4,419 posts
·
Joined 2014
Took a cruise down to Moab and ran Too of the World and Rose Garden Hill. I do want to get some 35’s, but I drug less than I was expecting going to the 4 seater. So that was a bonus. Also the low range in the max is awesome and they should have it in the 2 seaters. Rock crawling the DCT is different than the CVT for sure but having that connection is awesome and with the low gear you can really crawl nice and easy and controlled. You also don’t have the delay like with a cvt waiting to engage or walk the line of burning the belt or climbing the ledge. Will still take some learning how to crawl the longer machine but seems she will crawl! Not a super tough test though.
4,109 posts
·
Joined 2021
Crazy pictures!
How do you like it without the sway bar?
I would be so torn between the super low or not. It does sound appealing, but one nice thing about the 2 seater is (just like the X3) you can actually use Low to drive around on the trails. In our Sport that was not an option, it was Low for an obstacle, and high for everything else. I like being able to leave it in Low for slower sections and have better engine braking and stuff going down the mountain.
13,737 posts
·
Joined 2014
Is using low to drive around in that much better than just staying a lower gear in high?Crazy pictures!
How do you like it without the sway bar?
I would be so torn between the super low or not. It does sound appealing, but one nice thing about the 2 seater is (just like the X3) you can actually use Low to drive around on the trails. In our Sport that was not an option, it was Low for an obstacle, and high for everything else. I like being able to leave it in Low for slower sections and have better engine braking and stuff going down the mountain.
I would think super low would still be better because you can shift on the fly from low to high.
Tim
GloverXRS
Discussion starter
4,419 posts
·
Joined 2014
I just took the sway bar off yesterday so it was attached for my Moab trip. So not sure yet. As far as having the super low low range I think it’s phenomenal. I did the hole trail mostly in low. The nice thing is with 7 gears I can still do like 30 in low. Which is faster than the x3 but low first is still really low as well as the other gears. Changing low to high on the fly is nice not having to stop completely and switch and start again. When going super slow downhill and not on the throttle you do still get the free wheel like a cvt does. Overall I really liked it.
14 posts
·
Joined 2024
Awesome build! Just got our Mav R MAX last weekend and we're starting to stack up the accessory list already!
Since we got a Bent Metal full windshield, we're realizing we better get the cold-air roof scoop too. We've got some flags (fiberglass) as well as a couple 3ft LED whips from Kemimoto, I went with this brand because you can get them with rollbar clamps, springs and they're bluetooth. I looked at 5150, Marshin, R1, etc but it's really hard to tell which are the best, brightest and what features they have, so if these break I'll just go with a different brand.
To finish up on the light setup, I'm looking to pick up some Baja Designs squadron lights and also the ONX 6 40" light bar. I'm finding some of them on FB Marketplace for a nice discount.
We're still looking for a spare tire rack, would be great if there was one that went over the trunk aread and had a place for a jack.
Other than helmets and intercom, I think we're pretty much set because this machine is such a beast straight from the factory.
14 posts
·
Joined 2024
Curious to know how you're learning this stuff. Are there any videos detailing how to mount and wire up lights/whips/intercom type stuff? I think I'm going to need a power management system/SwitchWorks type of controller and then getting everything playing nice together seems like a lot to get going. Where can a n00b get up to speed?
GloverXRS
Discussion starter
4,419 posts
·
Joined 2014
Started adding a few bags over the weekend. The Canam factory bags seem to be of good quality at initial use. We will see how they hold up. The overhead bag had a nice hard plastic back that straps up so it doesn’t sag. It should work nicely.
GloverXRS
Discussion starter
4,419 posts
·
Joined 2014
Also the factory winch setup goes in this spot below. I was hoping to use it, but the SuperATV black ops winch that has wireless control comes with a bigger solenoid that won’t fit in the factory made location. So I am going to move it just to the passenger side. Battery cables only have to be about 18” long to reach to the posts that are already run from the battery. The factory harness utilizes the winch for these as well so I figure they must be perfectly sufficient. So this saves running a bunch of wire. I am also going to wire the winch in and out into my switchworks. This takes two buttons, but the only slots open are between the seats and not sure I want my winch switch down there.
GloverXRS
Discussion starter
4,419 posts
·
Joined 2014
Got a little more work done this afternoon. Wired the battery cables to winch solenoid and also ran the in and out button into my switchworks. While I was at it I also added my Gorilla Aloha controller in and got my wires ran up to where I will mount my whips. I have the integration to make my whips also be brake lights and blinkers. And they have a reverse light setting as well. The left and right turn signals are easy as my street legal kit runs right down the center console as well. So I will just tap into those right there. Does anyone know what may be the easiest to find the brake wire in the center console if possible and not have to run clear out to a taillight to pick it up. Also any ideas on a reverse signal?
![Image]()
I also added the tablet holder. I wanted it to be a little water tight so I added some weather stripping before mounting it. I also just used speed nuts for the front two bolts rather than doing a nut and bolt like they send you with. I do need to get a longer bolt for the bolt behind the screen as the one it came with I can’t get to reach through and catch the factory speed nut.
![Image]()
![Image]()
I also added the tablet holder. I wanted it to be a little water tight so I added some weather stripping before mounting it. I also just used speed nuts for the front two bolts rather than doing a nut and bolt like they send you with. I do need to get a longer bolt for the bolt behind the screen as the one it came with I can’t get to reach through and catch the factory speed nut.
4,109 posts
·
Joined 2021
There should be a wire for the brake switch under the dash I would think. Reverse might be harder, you're not using the ACM right?
-
?
-
?
-
?
-
?
-
?
-
?
-
?
-
?
-
?
-
?
-
?
-
?
-
?
-
?
-
?
-
?
-
?
-
?
-
?
-
?
- posts
- 714K
- members
- 31K
- Since
- 2012
A forum community dedicated to Can-Am Maverick owners and enthusiasts. Come join the discussion about performance, accessories, modifications, troubleshooting, maintenance, and more!
Explore Our Forums
Top Contributors this Month
View All
Hollywood X3
429 Replies
AZ Off Road
294 Replies
HPnMORE4J
137 Replies


