Here is some info for installing springs. I hope it helps someone. Although some of the below information is specific to the specific manufacturers, some things will apply to some other brands of springs and machine models. Be aware that smart shocks are adjusted by computer and these adjustment recommendations apply mainly to non smart shocks. However, some advanced electronic shocks are adjustable from the computer screen.
First watch the Zbroz and ST install videos, just know they make it look way easier and some say you don't need anything to compress the springs to do the job. Myself and several others have found that to be fake news. Otherwise, the procedure used in the Zbroz and ST videos are pretty good and are definitely worth watching before getting started on this job.
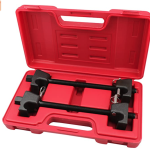
1. Coil Spring Compression Methods- I purchased a spring compressor kit like this one (below) for installing Eibach, MTS, Shock Therapy or Zebros springs. It works OK for most springs. Sometimes the shocks must be removed. Work carefully to not damage the powder coating. Use a good 3/8" drive impact wrench or get ready for an arm workout compressing the springs with a ratchet. This is the compressor I use. You can see it has been used a lot.
![Image]()
I found this method on line from one of my competitors (Rock Peak UTV). I have not tried that method. Here it is in case you want to try it. See below:
I had heard a few people recommend ratchet straps but hadn't ever tried that method. My ratchet straps all had hooks attached at both ends so I wasn't sure how that worked because in the shortest scenario, the hooks were too far apart to hook onto anything. I figured out that if I cut one end of the strap, the one attached to the ratchet, I still had just enough length to loop the strap through the springs and back into the ratchet spool. I found using ratchet straps to compress the springs where needed to be FAR EASIER than dealing with the above style spring compressors. Also, it's very easy to slip some rags between the ratchet straps and the springs to protect them from damaging the powder coat.
Don't compress the springs any more than you have to and BE CAREFUL when you release them. Keep your hands as clear as possible, they POP hard and it's nearly impossible to pop both at once so I wouldn't even try it.
Here's what my straps looked like after I cut the hook from the end of the strap that is permanently attached to the ratchet:
![Image]()
Here's how you wrap them around the coils and protect the coils with rags. Cranking the ratchets is SO MUCH better than trying to get the coil spring compressor tools to fit and then cranking on them. Like the Zbroz video, I did not have to remove the shocks from the car, just the lower bolt from each shock.
![Image]()
2. Setting Spring Ride Height:
Follow what it says in the instructions with the kit first for a baseline. After shock re-assembly and setting the pre-load and crossover rings to the baseline from the instructions for you kit/car, set the car on the ground and pull the machine back and forth to settle the suspension. Then re-adjust the pre-load to fine tune the ride height if needed. The spring divider should not be hitting the crossover ring at this point, if it is, adjust them up and out of the way. Make sure to compensate ride height for larger tires. Example, if you have 30s on a car that came with 29s, set your ride height .5" over stock. I set my springs about 1/2" higher than needed to try to account for some spring settling. Check ride height and after a few hundred miles of riding. Once you have the pre-load/ride height where it should be, don't forget to go back and adjust the crossovers.
3. Crossovers:
Clean the shock body threads and spray some WD40 on the threads to make adjusting the crossover rings easier. I found that even without the springs on, the one piece crossover rings can be difficult to rotate on the shock body to get them into position. Put them on first and set higher than needed. At some point you will be adjusting the crossovers with the spring on.
Adjusting crossovers is an overlooked and important procedure. Crossovers are not needed for the smoothest ride for some easy riders in my opinion. However, for better handling and to avoid bottoming proper adjustment is needed. Manufacturers usually give a spec for the starting point adjustment. However, the instructions sometimes are unclear or are misunderstood. A good rule of thumb to use is stated below once the springs are set at ride height.
Start about 1" higher than the plastic spring divider for the front. Raise for a smoother ride, lower for better handling or to avoid bottoming out.
On the rear I start at about 1.5" above the spring divider. Raise for a smoother ride, lower for better handling or to avoid bottoming out.
4. Clicker Adjustment:
Some shocks will have compression adjustments. Others will have compression and rebound. Compression and rebound adjustable shocks are an advantage. Here are some rule of thumb adjustment procedures below:
Compression
Start full soft and go ride. Adjust more compression in if the shocks bottom out. Go about half way first and fine tune from there. The least amount of compression that lets the shock function without bottoming out yields the best ride.
Rebound
Rebound is more complicated and less understood. It is more in the range of expert tuners. I will attempt to relay what I know and it usually comes down to trial and error until you get what you like. Start at the least amount of rebound and go ride. Add rebound if the back of the car is bucking over jumps or bumps (back raises). Add rebound until the bucking is reduced or eliminated. Now go into some whoops. If the car handles the whoops your good to go. If the suspension is packing (tires coming off the ground from slow suspension travel) reduce rebound to an acceptable level. Go try a bump or jump again to check how your machine is working.
5. Nitrogen Charge:
It is good practice to set the nitrogen charge at this point now that the springs are on. Jack the UTV up and set the pressure at about 150 psi (rule of thumb). The range on most shocks is 125 psi to 200 psi. Nitrogen charge pressure can affect the ride of your vehicle slightly. Go 125 psi if the ride is too harsh and see if that helps. Go to a higher pressure if the ride is too soft and bottoming out. Do this if the crossover adjustment cannot get rid of the bottoming out. Stiffer springs are needed if crossover adjustment, clicker adjustment, and nitrogen pressure cannot compensate.
First watch the Zbroz and ST install videos, just know they make it look way easier and some say you don't need anything to compress the springs to do the job. Myself and several others have found that to be fake news. Otherwise, the procedure used in the Zbroz and ST videos are pretty good and are definitely worth watching before getting started on this job.
1. Coil Spring Compression Methods- I purchased a spring compressor kit like this one (below) for installing Eibach, MTS, Shock Therapy or Zebros springs. It works OK for most springs. Sometimes the shocks must be removed. Work carefully to not damage the powder coating. Use a good 3/8" drive impact wrench or get ready for an arm workout compressing the springs with a ratchet. This is the compressor I use. You can see it has been used a lot.
I found this method on line from one of my competitors (Rock Peak UTV). I have not tried that method. Here it is in case you want to try it. See below:
I had heard a few people recommend ratchet straps but hadn't ever tried that method. My ratchet straps all had hooks attached at both ends so I wasn't sure how that worked because in the shortest scenario, the hooks were too far apart to hook onto anything. I figured out that if I cut one end of the strap, the one attached to the ratchet, I still had just enough length to loop the strap through the springs and back into the ratchet spool. I found using ratchet straps to compress the springs where needed to be FAR EASIER than dealing with the above style spring compressors. Also, it's very easy to slip some rags between the ratchet straps and the springs to protect them from damaging the powder coat.
Don't compress the springs any more than you have to and BE CAREFUL when you release them. Keep your hands as clear as possible, they POP hard and it's nearly impossible to pop both at once so I wouldn't even try it.
Here's what my straps looked like after I cut the hook from the end of the strap that is permanently attached to the ratchet:
Here's how you wrap them around the coils and protect the coils with rags. Cranking the ratchets is SO MUCH better than trying to get the coil spring compressor tools to fit and then cranking on them. Like the Zbroz video, I did not have to remove the shocks from the car, just the lower bolt from each shock.
2. Setting Spring Ride Height:
Follow what it says in the instructions with the kit first for a baseline. After shock re-assembly and setting the pre-load and crossover rings to the baseline from the instructions for you kit/car, set the car on the ground and pull the machine back and forth to settle the suspension. Then re-adjust the pre-load to fine tune the ride height if needed. The spring divider should not be hitting the crossover ring at this point, if it is, adjust them up and out of the way. Make sure to compensate ride height for larger tires. Example, if you have 30s on a car that came with 29s, set your ride height .5" over stock. I set my springs about 1/2" higher than needed to try to account for some spring settling. Check ride height and after a few hundred miles of riding. Once you have the pre-load/ride height where it should be, don't forget to go back and adjust the crossovers.
3. Crossovers:
Clean the shock body threads and spray some WD40 on the threads to make adjusting the crossover rings easier. I found that even without the springs on, the one piece crossover rings can be difficult to rotate on the shock body to get them into position. Put them on first and set higher than needed. At some point you will be adjusting the crossovers with the spring on.
Adjusting crossovers is an overlooked and important procedure. Crossovers are not needed for the smoothest ride for some easy riders in my opinion. However, for better handling and to avoid bottoming proper adjustment is needed. Manufacturers usually give a spec for the starting point adjustment. However, the instructions sometimes are unclear or are misunderstood. A good rule of thumb to use is stated below once the springs are set at ride height.
Start about 1" higher than the plastic spring divider for the front. Raise for a smoother ride, lower for better handling or to avoid bottoming out.
On the rear I start at about 1.5" above the spring divider. Raise for a smoother ride, lower for better handling or to avoid bottoming out.
4. Clicker Adjustment:
Some shocks will have compression adjustments. Others will have compression and rebound. Compression and rebound adjustable shocks are an advantage. Here are some rule of thumb adjustment procedures below:
Compression
Start full soft and go ride. Adjust more compression in if the shocks bottom out. Go about half way first and fine tune from there. The least amount of compression that lets the shock function without bottoming out yields the best ride.
Rebound
Rebound is more complicated and less understood. It is more in the range of expert tuners. I will attempt to relay what I know and it usually comes down to trial and error until you get what you like. Start at the least amount of rebound and go ride. Add rebound if the back of the car is bucking over jumps or bumps (back raises). Add rebound until the bucking is reduced or eliminated. Now go into some whoops. If the car handles the whoops your good to go. If the suspension is packing (tires coming off the ground from slow suspension travel) reduce rebound to an acceptable level. Go try a bump or jump again to check how your machine is working.
5. Nitrogen Charge:
It is good practice to set the nitrogen charge at this point now that the springs are on. Jack the UTV up and set the pressure at about 150 psi (rule of thumb). The range on most shocks is 125 psi to 200 psi. Nitrogen charge pressure can affect the ride of your vehicle slightly. Go 125 psi if the ride is too harsh and see if that helps. Go to a higher pressure if the ride is too soft and bottoming out. Do this if the crossover adjustment cannot get rid of the bottoming out. Stiffer springs are needed if crossover adjustment, clicker adjustment, and nitrogen pressure cannot compensate.